> ## Documentation Index
> Fetch the complete documentation index at: https://dripart-chore-sync-comfy-api-v2-spec-0ee014e.mintlify.site/llms.txt
> Use this file to discover all available pages before exploring further.

#  Rodin 合作伙伴节点模型生成 ComfyUI 官方示例

> 本文将介绍如何在 ComfyUI 中使用 Rodin 节点的 API 来进行模型生成

Hyper3D Rodin (hyper3d.ai) 是一个专注于通过人工智能快速生成高质量、可直接用于生产环境的3D模型和材质的平台。
目前 ComfyUI 已原生集成了对应 Rodin 模型生成 API ，现在你可以在 ComfyUI 中便捷地使用相关节点来进行模型生成

目前 ComfyUI 的 合作伙伴节点中已经支持 Rodin 以下模型生成能力：

* 单视角模型生成
* 多视角模型生成
* 多种不同精度的模型生成

<Tip>
  使用 API 节点需要保证你已经正常登录，并在受许可的网络环境下使用，请参考[API 节点总览](/zh/tutorials/partner-nodes/overview)部分文档来了解使用 API 节点的具体使用要求。
</Tip>

<Tip>
  <Tabs>
    <Tab title="本地用户">
      请确保你的 ComfyUI 已经更新。

      * [ComfyUI 下载](https://www.comfy.org/download)
      * [ComfyUI 更新教程](/zh/installation/update_comfyui)

      本指南里的工作流可以在[工作流模板](/zh/interface/features/template)中找到。如果找不到，可能是 ComfyUI 没有更新。

      如果加载工作流时有节点缺失，可能原因有：

      1. 你用的不是最新版（每夜版）。
      2. 启动时有些节点导入失败。
    </Tab>

    <Tab title="云端用户">
      * [Cloud](https://cloud.comfy.org) 会在 ComfyUI 稳定版本发布后更新。

      所以，如果你发现本文档中有任何核心节点缺失，可能是因为新核心节点尚未在最新稳定版中发布。请等待下一个稳定版发布。
    </Tab>
  </Tabs>
</Tip>

## 单视角模型生成工作流

使用 Rodin 从单张图像输入生成 3D模型。

<img src="https://raw.githubusercontent.com/Comfy-Org/workflow_templates/main/templates/api_rodin_image_to_model-1.webp" alt="Rodin 单视角模型生成工作流预览" />

<CardGroup cols={2}>
  <Card title="下载工作流文件" icon="download" href="https://raw.githubusercontent.com/Comfy-Org/example_workflows/refs/heads/main/api_nodes/rodin/rodin_image_to_model.json">
    单视角模型生成（JSON 格式）
  </Card>

  <Card title="在 Comfy Cloud 上运行" icon="cloud" href="https://cloud.comfy.org/?template=api_rodin_image_to_model&utm_source=docs&utm_medium=referral&utm_campaign=model-generation">
    在 Comfy Cloud 中打开
  </Card>
</CardGroup>

<details className="prose" style={{marginBottom:"1rem"}}>
  <summary>输入材料</summary>

  下载此示例输入图像以试用该工作流：

  <CardGroup cols={1}>
    <Card title="输入图像" icon="image" href="https://raw.githubusercontent.com/Comfy-Org/workflow_templates/main/input/api_rodin_image_to_model_input_image.png">
      下载示例输入图像
    </Card>
  </CardGroup>
</details>

![输入图像](https://raw.githubusercontent.com/Comfy-Org/example_workflows/refs/heads/main/api_nodes/rodin/doll.jpg)

### 2. 按步骤完成工作流的执行

<img src="https://mintcdn.com/dripart-chore-sync-comfy-api-v2-spec-0ee014e/Hn4qr2OT9Hc7m69G/images/tutorial/api_nodes/rodin/rodin_image_to_model_step_guide.jpg?fit=max&auto=format&n=Hn4qr2OT9Hc7m69G&q=85&s=ad83090af1a23ac0f37a802f8d8db9f7" alt="ComfyUI Rodin 图像转模型步骤指南" width="3184" height="1966" data-path="images/tutorial/api_nodes/rodin/rodin_image_to_model_step_guide.jpg" />

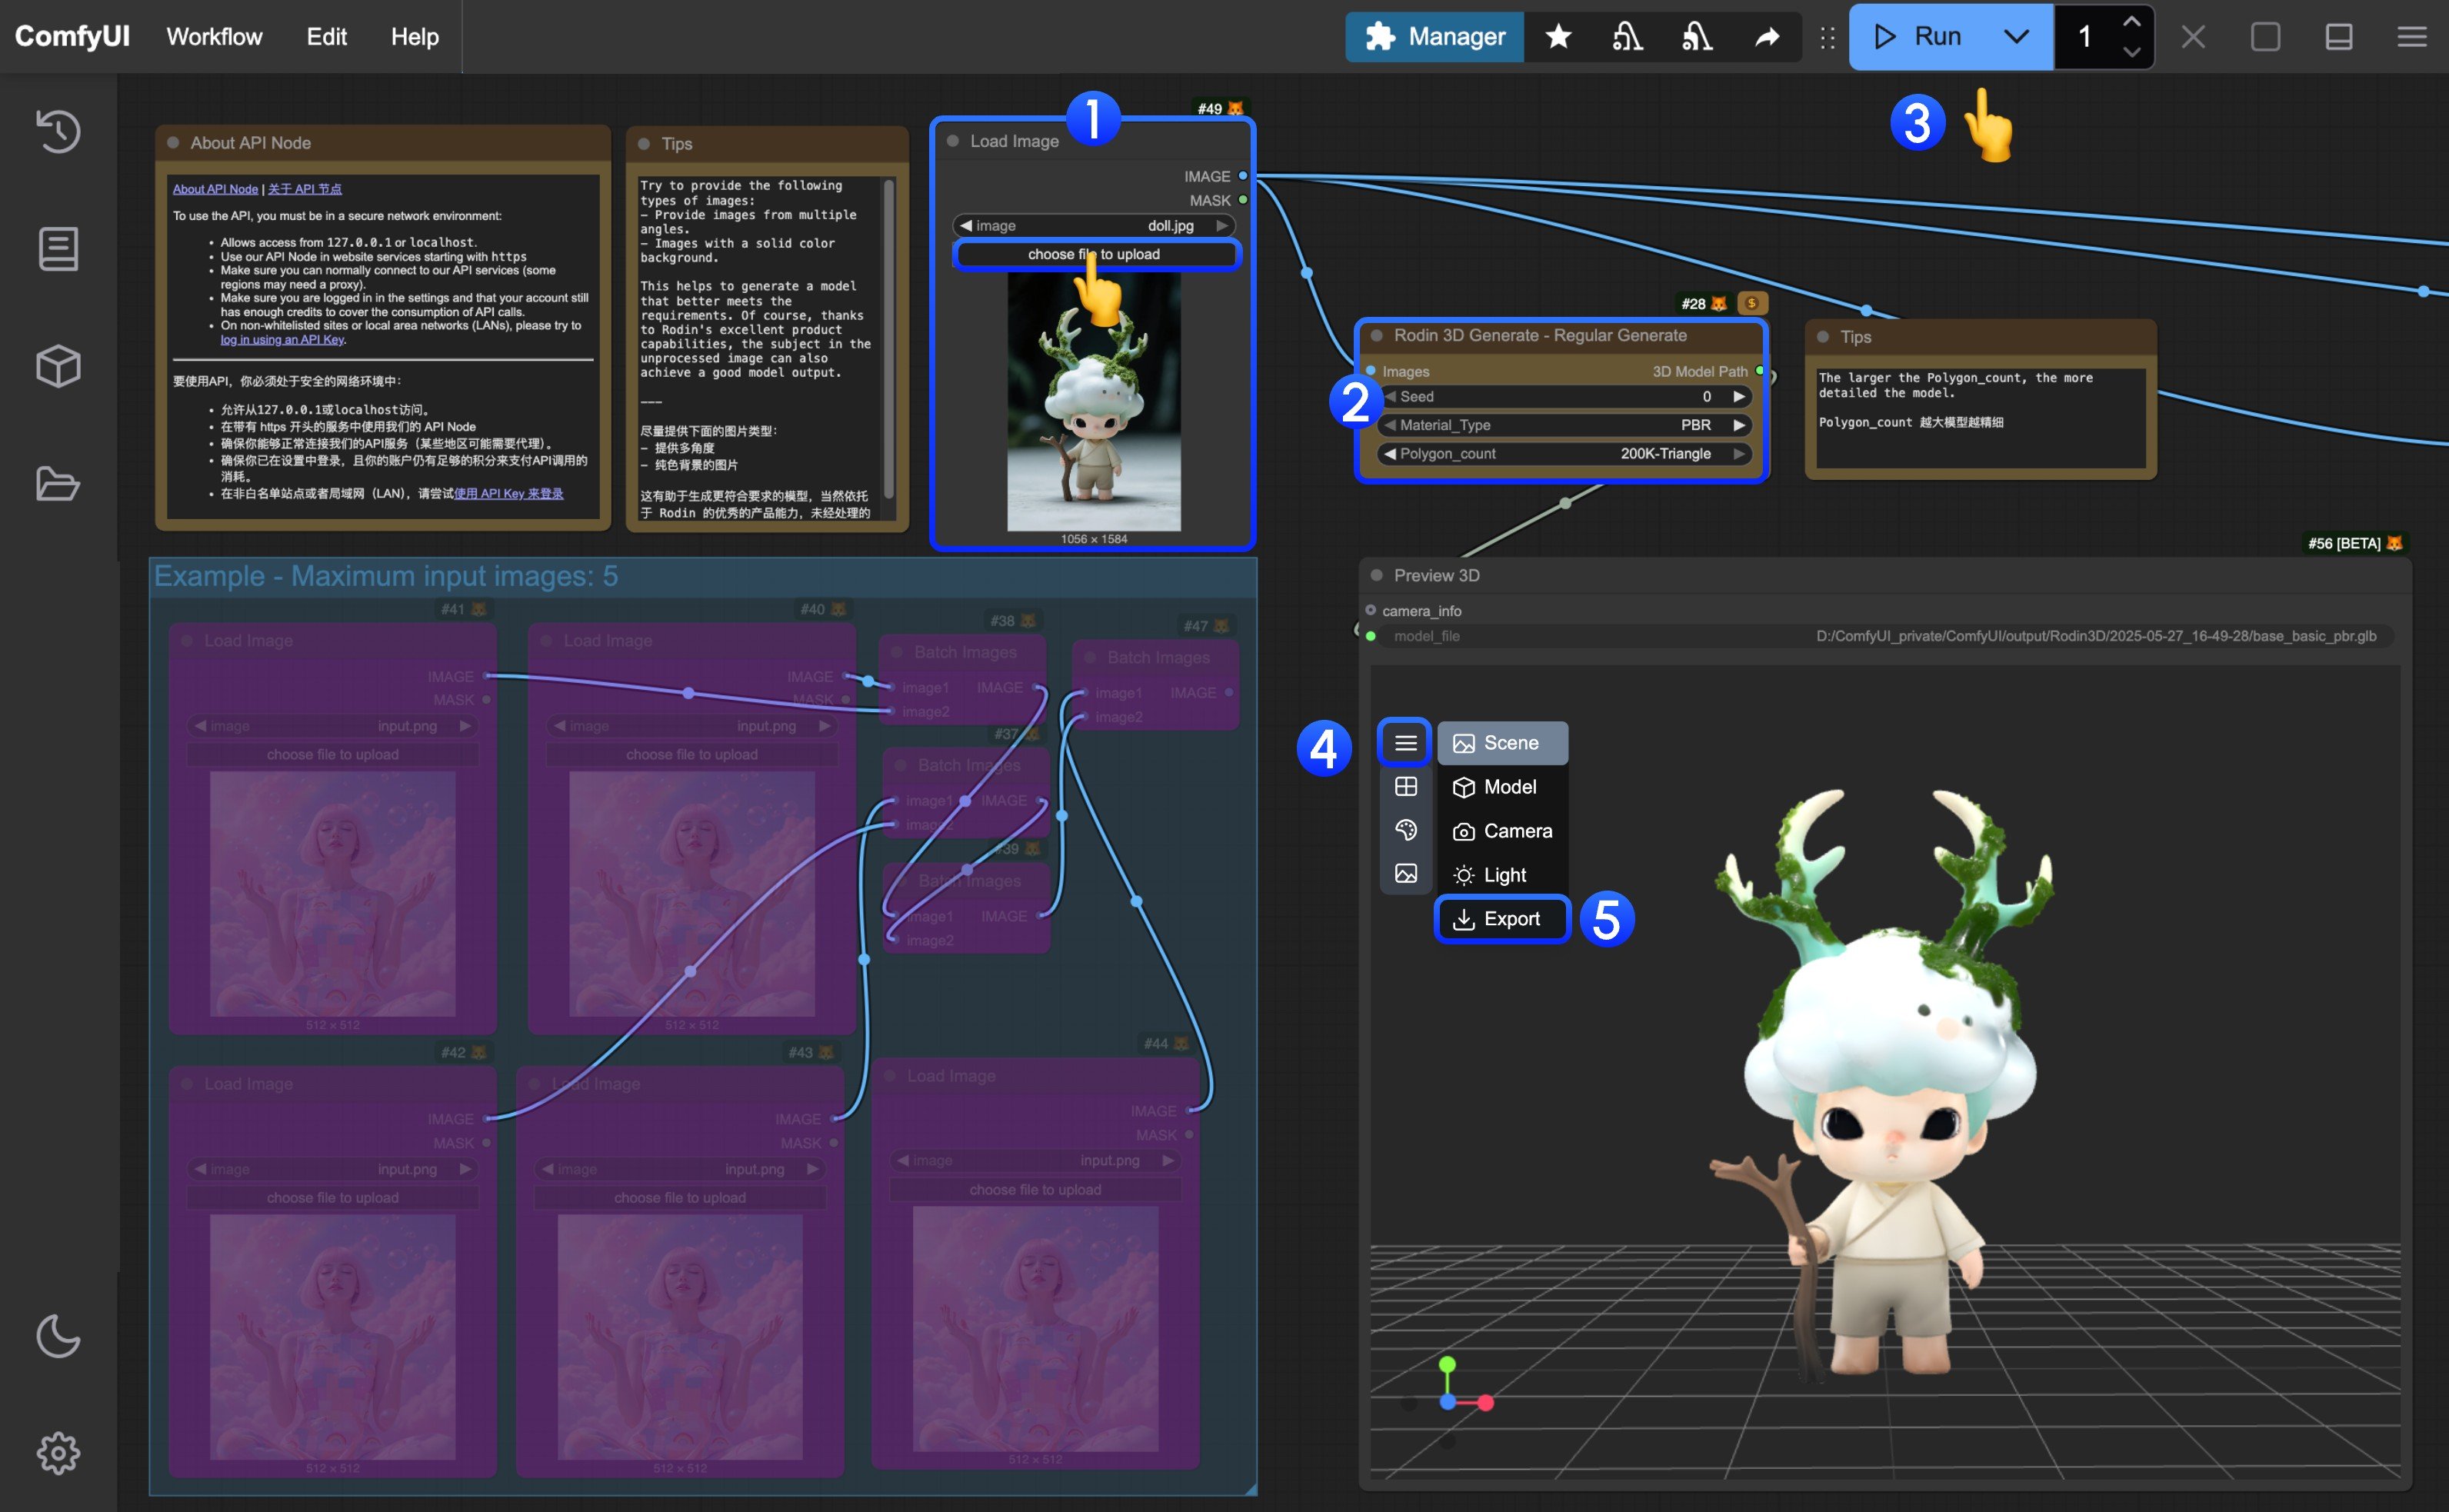
你可以参考图片中的序号来完成基本的文生图工作流执行：

1. 在 `Load Image` 节点中，加载提供的输入图像
2. (可选) 在 `Rodin 3D Generate - Regular Generate` 中调整相应参数
   * polygon\_count：你可以设置不同的多边形数量，数值越高，模型越平滑、越精细
3. 点击 `Run` 按钮，或使用快捷键 `Ctrl(cmd) + Enter` 来执行模型生成。工作流完成后，对应的模型将自动保存到 `ComfyUI/output/Rodin` 目录
4. 在 `Preview 3D` 节点中，点击展开菜单
5. 选择 `Export` 可直接导出相应的模型

## 多视角模型生成工作流

对应的 `Rodin 3D Generate - Regular Generate` 最多允许 5 张图像输入

### 1. 工作流文件下载

你可以将单视角工作流修改为多视角工作流，或者直接下载下方的工作流文件

<img src="https://raw.githubusercontent.com/Comfy-Org/workflow_templates/main/templates/api_rodin_multiview_to_model-1.webp" alt="Rodin 多视角模型生成工作流预览" />

<CardGroup cols={2}>
  <Card title="下载工作流文件" icon="download" href="https://raw.githubusercontent.com/Comfy-Org/example_workflows/refs/heads/main/api_nodes/rodin/multiview_to_model/api_rodin_multiview_to_model.json">
    多视角模型生成（Json 格式）
  </Card>

  <Card title="在 Comfy Cloud 上运行" icon="cloud" href="https://cloud.comfy.org/?template=api_rodin_multiview_to_model&utm_source=docs&utm_medium=referral&utm_campaign=model-generation">
    在 Comfy Cloud 中打开
  </Card>
</CardGroup>

<details className="prose" style={{marginBottom:"1rem"}}>
  <summary>输入素材</summary>

  下载这些示例输入图像以试用该工作流：

  <CardGroup cols={3}>
    <Card title="正面视图" icon="image" href="https://raw.githubusercontent.com/Comfy-Org/workflow_templates/main/input/api_rodin_multiview_to_model_front.jpg">
      下载正面视图
    </Card>

    <Card title="背面视图" icon="image" href="https://raw.githubusercontent.com/Comfy-Org/workflow_templates/main/input/api_rodin_multiview_to_model_back.jpg">
      下载背面视图
    </Card>

    <Card title="左侧视图" icon="image" href="https://raw.githubusercontent.com/Comfy-Org/workflow_templates/main/input/api_rodin_multiview_to_model_left.jpg">
      下载左侧视图
    </Card>
  </CardGroup>
</details>

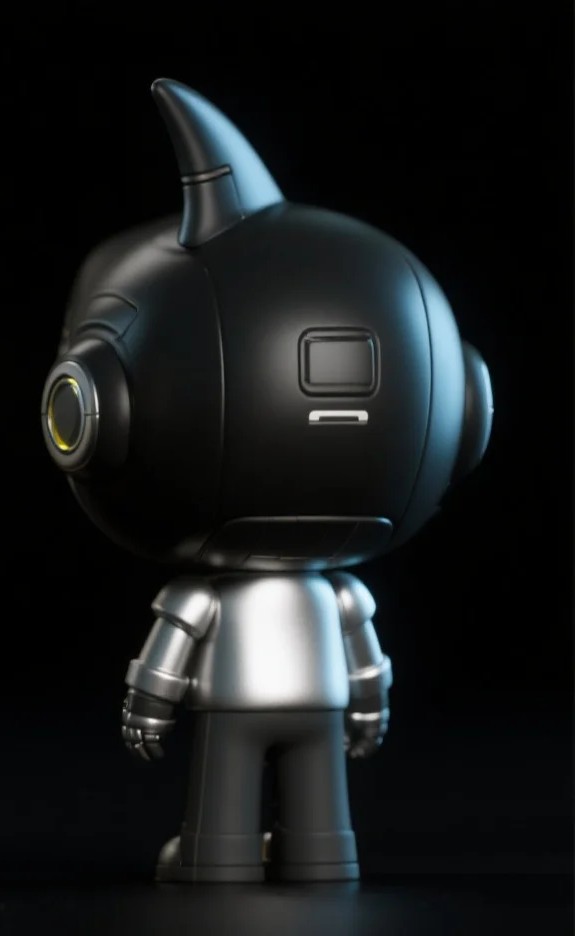
![输入图像](https://raw.githubusercontent.com/Comfy-Org/example_workflows/refs/heads/main/api_nodes/rodin/multiview_to_model/front.jpg)
![输入图像](https://raw.githubusercontent.com/Comfy-Org/example_workflows/refs/heads/main/api_nodes/rodin/multiview_to_model/back.jpg)
![输入图像](https://raw.githubusercontent.com/Comfy-Org/example_workflows/refs/heads/main/api_nodes/rodin/multiview_to_model/left.jpg)

### 2. 按步骤完成工作流执行

<img src="https://mintcdn.com/dripart-chore-sync-comfy-api-v2-spec-0ee014e/Hn4qr2OT9Hc7m69G/images/tutorial/api_nodes/rodin/rodin_multiview_to_model_step_guide.jpg?fit=max&auto=format&n=Hn4qr2OT9Hc7m69G&q=85&s=ced4976c34a4a2b697c4776441387254" alt="ComfyUI Rodin Image to Model Step Guide" width="3062" height="1862" data-path="images/tutorial/api_nodes/rodin/rodin_multiview_to_model_step_guide.jpg" />

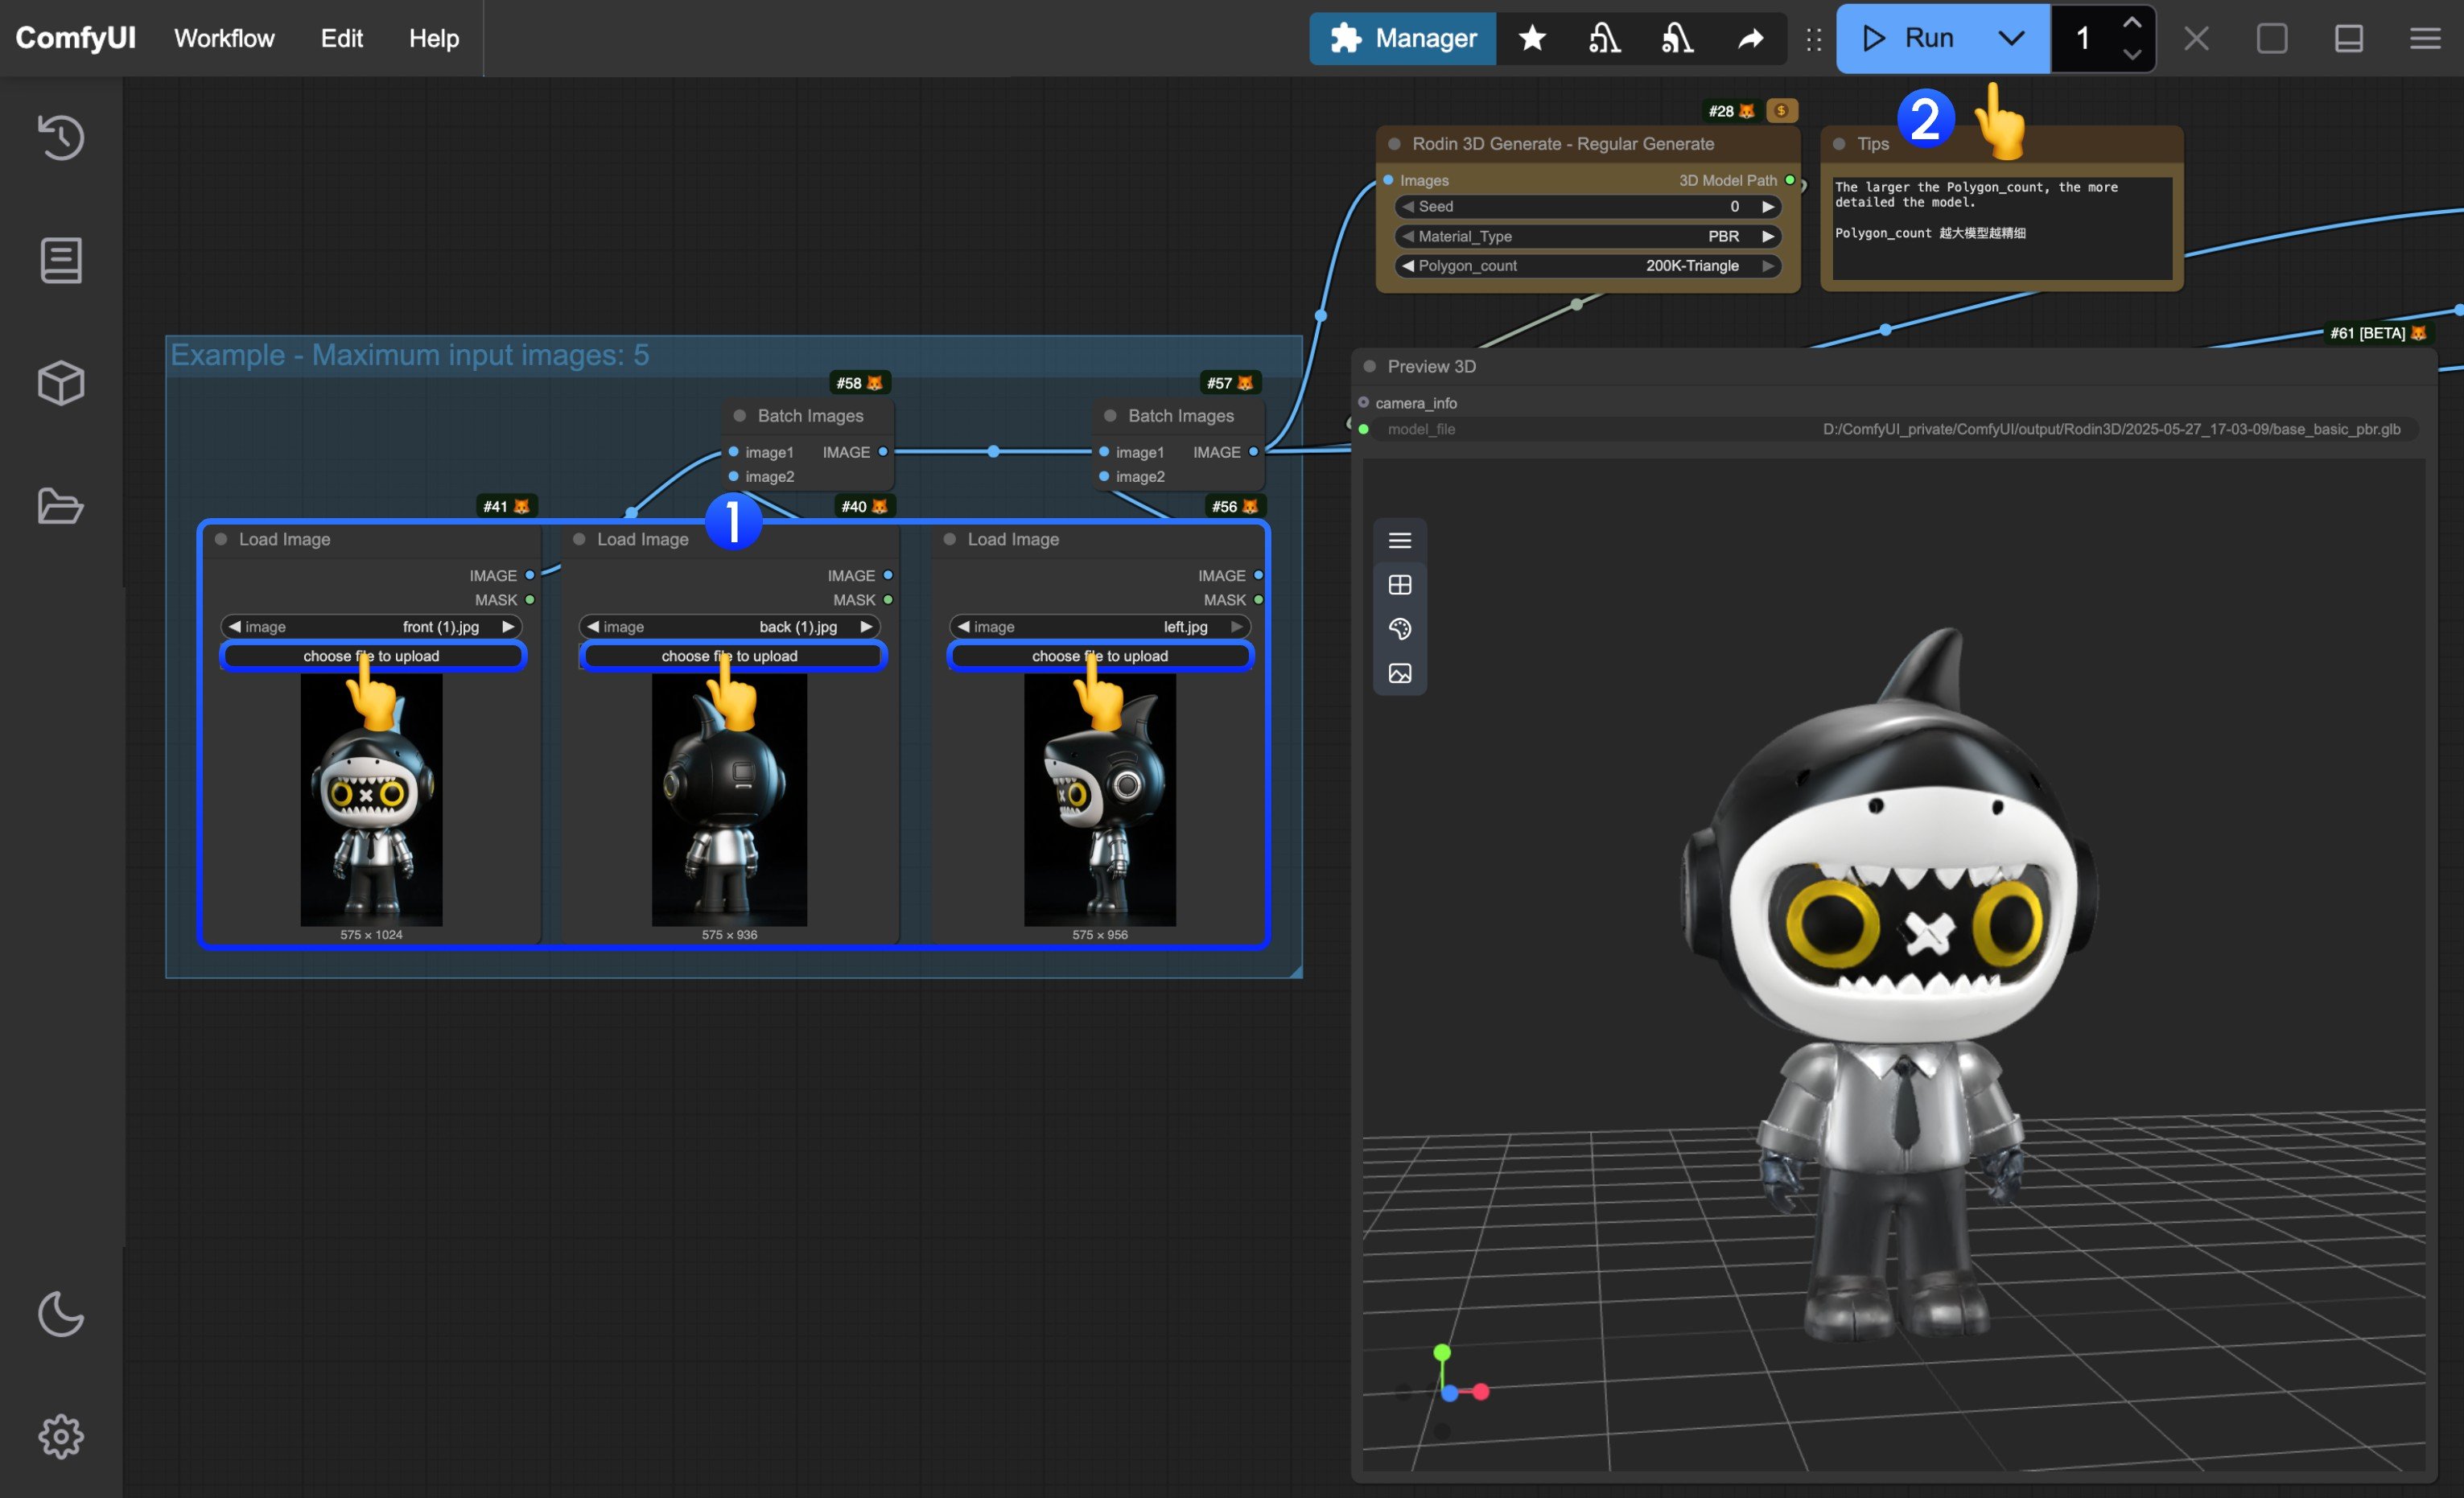
你可以参考图片中的序号来完成基础文生图工作流执行：

1. 在 `Load Image` 节点中加载提供的输入图像
2. 点击 `Run` 按钮，或使用快捷键 `Ctrl(cmd) + Enter` 执行模型生成。工作流完成后，对应的模型将自动保存到 `ComfyUI/output/Rodin` 目录
3. 在 `Preview 3D` 节点中，点击展开菜单
4. 选择 `Export` 直接导出对应的模型

## 其它相关节点

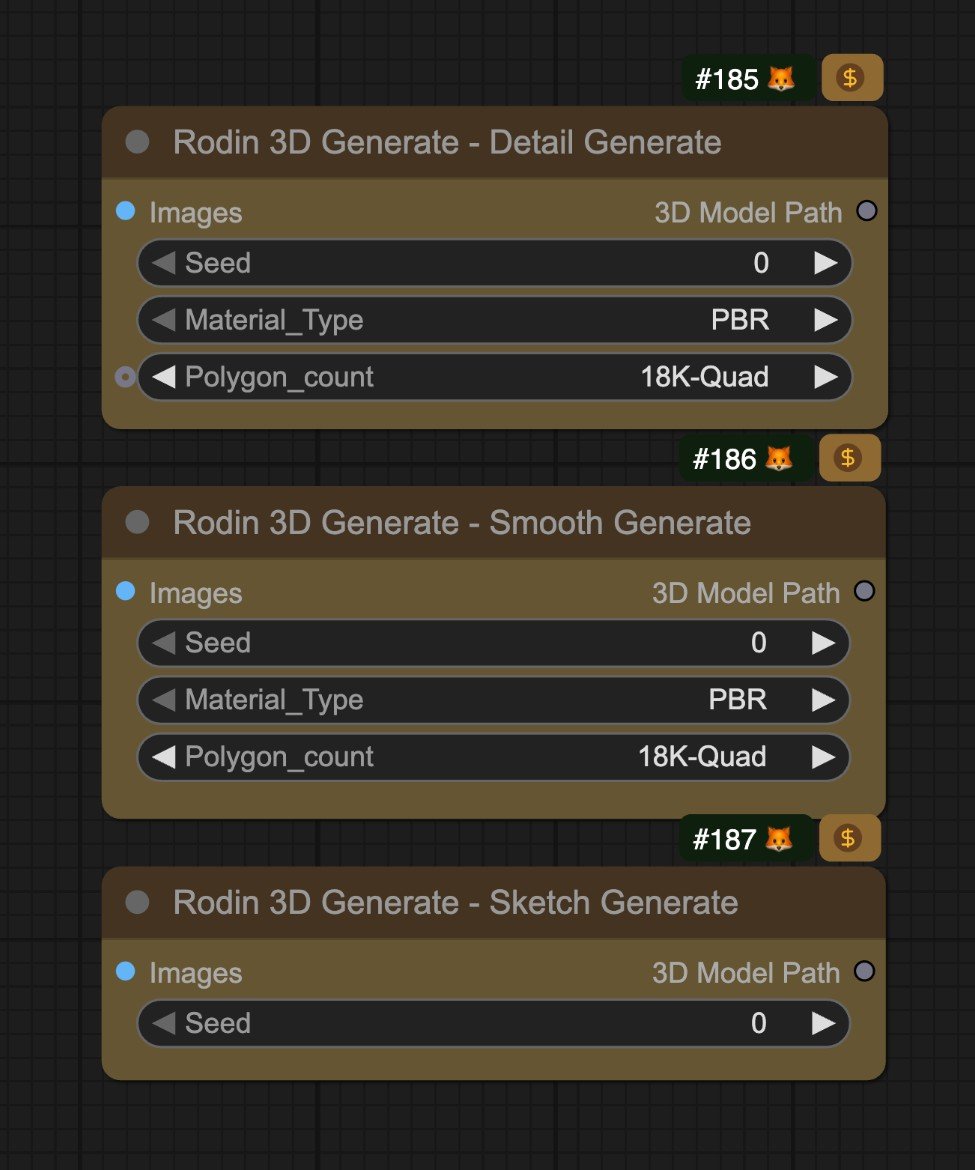
目前在 ComfyUI 中， Rodin 提供了不同类型的模型生成节点，由于对应输入条件与本文介绍的工作流相同，你可以按需启用，另外在对应模板中，我们提供了对应的节点，你也可以按需修改对应节点模式来启用

<img src="https://mintcdn.com/dripart-chore-sync-comfy-api-v2-spec-0ee014e/Hn4qr2OT9Hc7m69G/images/tutorial/api_nodes/rodin/other_nodes.jpg?fit=max&auto=format&n=Hn4qr2OT9Hc7m69G&q=85&s=688a3b97802a92082d641f26a71f95ed" alt="Rodin 其它相关节点" width="975" height="1170" data-path="images/tutorial/api_nodes/rodin/other_nodes.jpg" />